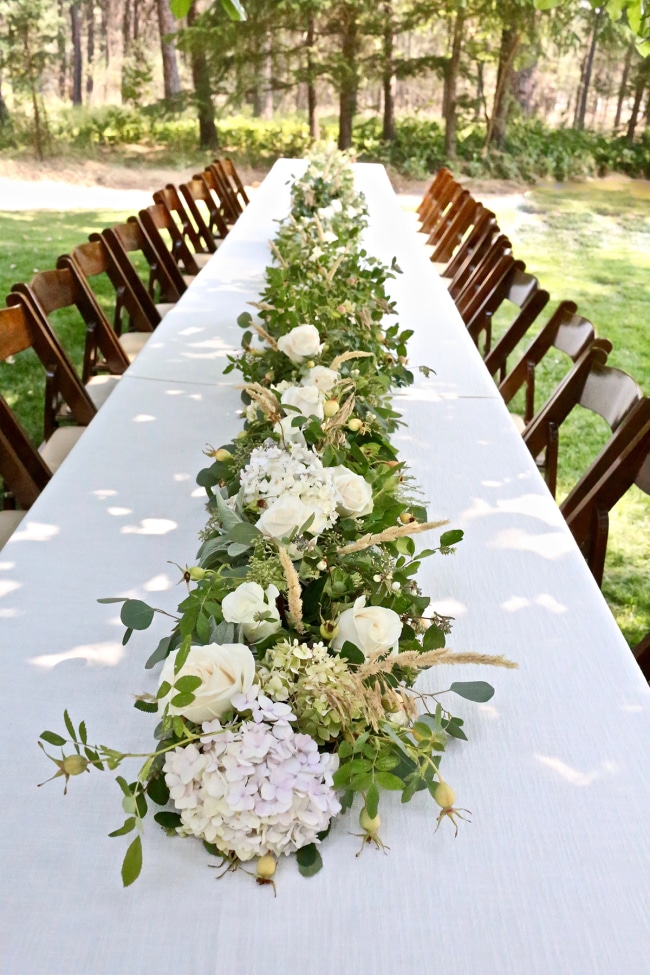
We celebrated my mother and father-in-law’s 50th wedding anniversary this week. Colin is one of six siblings and there are sixteen grandchildren. I think mostly because we’re such a big family and to keep it as intimate as possible, my parents-in-law decided to keep the celebration to just the 32 of us. The six siblings all took part in putting the party together and asked me to be responsible for the centerpieces for the table. Because it was such a momentous occasion, I wanted to do more than just a few centerpieces on the long table. I wanted it to be enormous – to really make a statement, reflecting this big day. Today I’m sharing step-by-step process of how I created this long floral table runner centerpiece and how you can make one too.
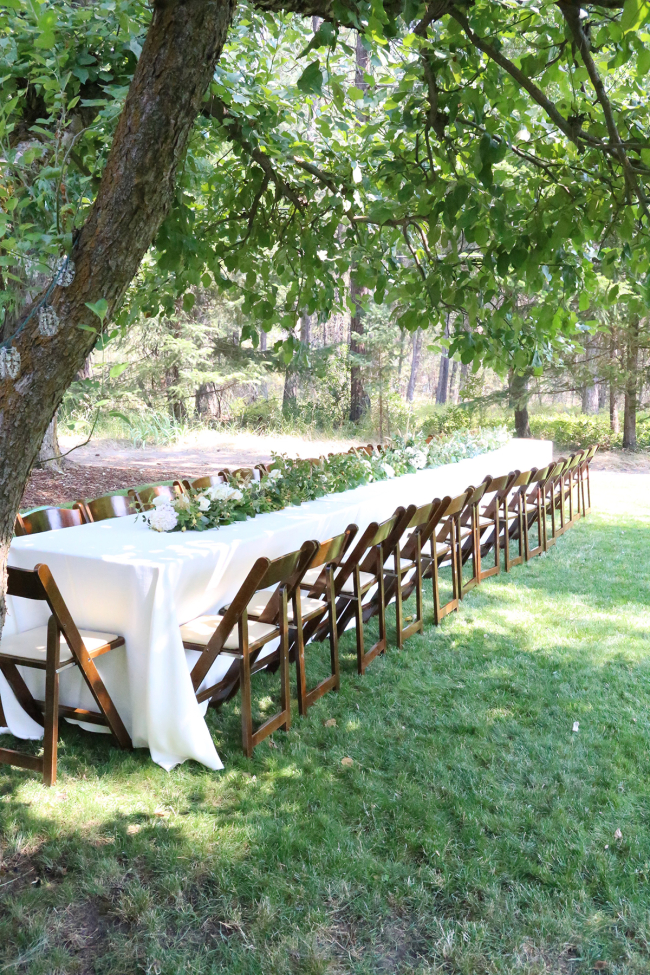
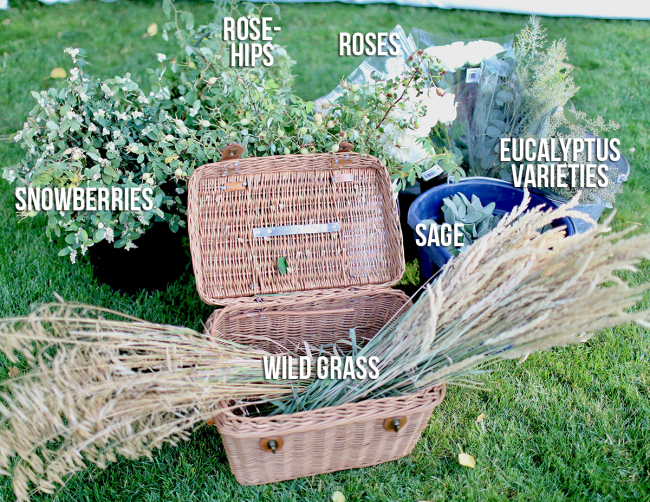
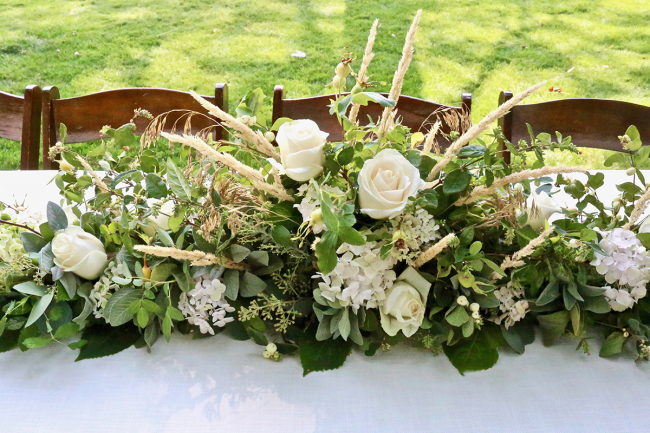
To give the runner an extra special touch and to save money on the cost, I foraged for Rosehips, Snowberries, and Wild Grass from the roadside, and Sage and Hydrangea from my yard. I limited purchased add-ins to a variety of Eucalyptus from the store along with sixty white roses. (The Hydrangea blossoms are not seen in the picture below, because they were protected in a large kitchen garbage bag full of cold water. The flower petals on hydrangeas absorb water so it’s a nice way to keep the Hydrangea extra hydrated before placing).
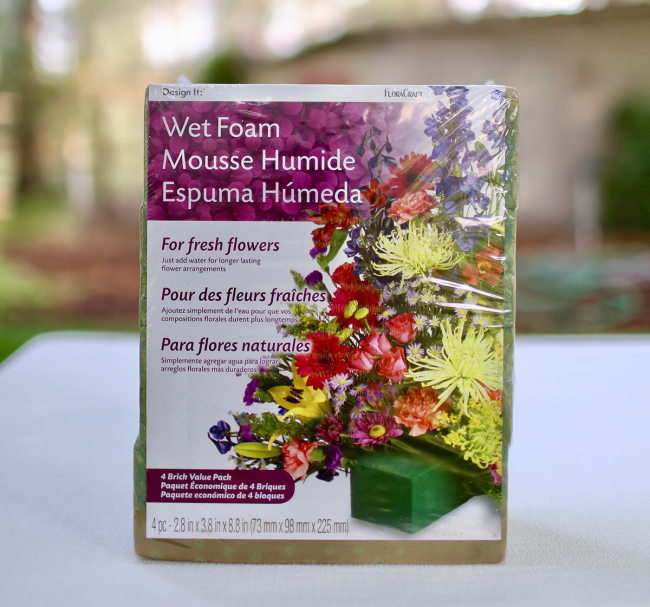
The forecast for the day was 90 degrees Fahrenheit. I knew there was no way anything other than the Eucalyptus would withstand the heat and the greenery and flowers would definitely wither without a water source. After some trial runs, I settled on using floral foam as the base.
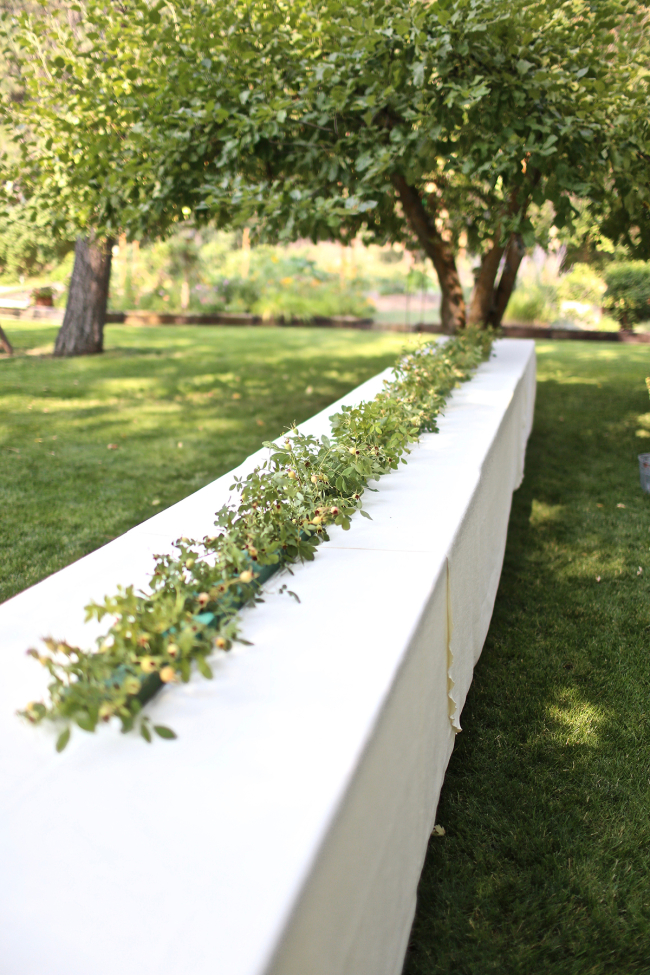
Because the floral foamis wet, I put down a base of Saran Wrap to keep the tablecloth from absorbing all of the water from the foam. I stretched it out to the length I needed and then pushed the sides in until it was just wide enough to hold the foam.

Floral foam is super simple to use and is great for keeping flowers hydrated AND for creating a heavy stabile base for your creation. Another way I kept the cost down was to cut each of the blocks in half horizontally, getting twice the coverage for the same cost. There are several varieties of floral foam on the market, with most of the options at the store for artificial flowers. You DON’T want any of those varieties. You want the WET FOAM variety for use with fresh flowers. To use, you’ll need a bucket of water or a deep sink or basin to drop your foam blocks into. There needs to be enough room for the block to be able to be completely covered once it has absorbed all the water it is going to absorb. (So, if you’re using a block that is 9 inches tall, you’ll want there to be at least 10 inches of water). Keep in mind, if you’re using a lot of blocks like I did for the runner, you’ll need A LOT of water because each block absorbs quite a bit. I used a 10 gallon bucket filled nearly to the top and had to refill it once. Simply place the foam block on top of the water. It will quickly absorb the water, and sink just below the surface. Remove the block, allow a tiny bit of excess water to drain, and then place on the table as is or cut in half with a large kitchen knife as I did, and place.

As you can see in the picture above, I pushed in the Saran Wrap to just wide enough to protect the foam and make it so it couldn’t be seen. You’ll notice I left one of the blocks its original size to mark the true center of the runner. That way I could create a center focal point and also have a clear visual as I’m building it out beginning with the center point foliage angling straight up, everything to the left of center leaning left, and everything right of center leaning right. Although the arrangement is a bit wild or earthy in nature, to keep the overall look well thought out, there needs to be order. The center, left, right system does that.

As you can see in the picture above, I pushed in the Saran Wrap to just wide enough to protect the foam and make it so it couldn’t be seen. You’ll notice I left one of the blocks its original size to mark the true center of the runner. That way I could create a center focal point and also have a clear visual as I’m building it out beginning with the center point foliage angling straight up, everything to the left of center leaning left, and everything right of center leaning right. Although the arrangement is a bit wild or earthy in nature, to keep the overall look well thought out, there needs to be order. The center, left, right system does that.
After that, it was simply a process of layering in each subsequent type of greenery: the Snowberries, followed by the Sage, then Hydrangea, Eucalyptus, the Roses, and finally the Wild Grass, which was my way of adding in a bit of gold representing the 50th “Golden Anniversary”.


Notes & Tips:
Think about using several different types of greenery involving different textures such as berries, leaves, flowers, etc.
Sage is a big favorite of mine because of its velvety leaves and clusters that are so great for filling in spaces. It also smells super great!
Hydrangea is great for coverage but can be fragile. Read my comments at the top of this post about how I treat the hydrangea before placing. The extra Hydrangea leaves are great to save for use later when you’ve run out of greenery and need something more to fill in any last minute gaps. Simply use the little stem at the tip of each leaf to poke into the foam.
When you start each layer, begin at the center and move to the right of center to place a sprig, then move to the left of center and place a sprig until you reach the end of both sides. THEN walk around to the other side of the table, to the center, and begin again. Do this with every layer so you will have consistently placed coverage and consistency in the look of the arrangement.
In total, I spent $38 dollars on the Roses and 3 Clusters of eucalyptus from Trader Joes. The foam was $25 dollars, with the overall cost totaling $63 dollars. (You can find it here). Not bad for such a massive arrangement
I spent five hours building the runner and several hours foraging before that, so there is definitely a time commitment.

IT'S ME, SERENA!
In 2002, I was dreaming of creating a fun and happy little event to sell my vintage and handmade goods. In 2002, I held my first event in my neighbor's barn along with a handful of friends. The sale became wildly popular and began attracting visitors from across the country and recognition in national magazines. Today The Farm Chicks Vintage & Handmade Fair fills the Spokane County Fairgrounds and features hundreds of creatively and carefully curated spaces packed with vintage and handmade goods. Many describe it as a bucket list event, magical, inspirational, and the best event of its kind in the USA. I describe it as the best weekend of the year!
MORE POSTS LIKE THIS
Natural Holiday Tablescape
Tablescapes add such a nice, warming touch to your home during the holidays. This year I decided to go with simple natural elements (greenery, fruit, and nuts) that are really pretty when gathered together. Best of all, it was really simple and inexpensive to create.I...

Festive Kitchen Christmas Tree
Decorating the kitchen with a small Christmas tree adds an extra bit of holiday cheer to your home. To continue my gingerbread theme this year, I made mini gingerbread houses and tiny stars for the ornaments and strung fresh cranberries as a garland. To finish it all...

How to Make a Fuller Garland
I love the tradition of placing a garland around the front door and I've discovered that I can make it much fuller by adding more elements to the garland once it's hung. I'll show you how! The first step is hanging the garland. I don't want to place any nail holes on...
COPYRIGHT 2024
THE FARM CHICKS
P.O. BOX 9866
SPOKANE, WA 99209

![]()
![]()
![]()
COPYRIGHT 2024
THE FARM CHICKS
P.O. BOX 9866
SPOKANE, WA 99209
![]()
![]()
![]()
You’re amazing! Wealth of knowledge. So smart and easy to follow. Thanks!